Juli 23, 2012
Performance Point: Code blocks are not allowed in this file
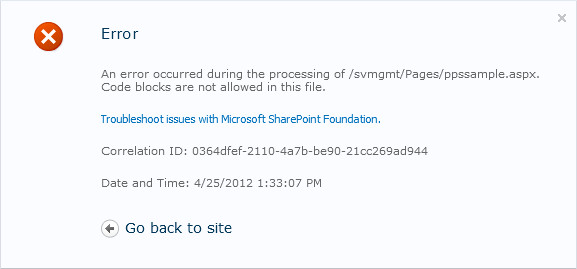
Nach der Konfiguration von Performance Point Service Application und der Erstellung einer Business Intelligence Center Site Collection im SharePoint 2010 erscheint die folgende Fehlermeldung:
An error occurred during the processing of //Pages/ppssample.aspx. Code blocks are not allowed in this file.
Öffnen Sie das web.config File in welcher sich das Business Intelligence Center befindet, suchen Sie nach dem Element <PageParserPaths> und fügen Sie folgendes unterhalb ein:
<PageParserPath VirtualPath="/PerformancePoint/Pages/ppssample.aspx" CompilationMode="Always" AllowServerSideScript="true" />
Das müsste dann ungefähr so aussehen:
<PageParserPaths>
<PageParserPath VirtualPath="/PerformancePoint/Pages/ppssample.aspx" CompilationMode="Always" AllowServerSideScript="true" />
</PageParserPaths>
Führen Sie anschliessend einen IIS Reset aus (Command Line: iisreset /noforce)
Juli 20, 2012
Business Intelligence Part 5: Configuring PerformancePoint Services
Dieser Artikel steht nur in englisch zur Verfügung.
Part 1: Installing SQL Reporting Services
Part 2: Configuring Reporting Services
Part 3: Installing PowerPivot for SharePoint
Part 4: Configuring PowerPivot for SharePoint
Part 5: Configuring PerformancePoint Services
In Central Administration > Application Management > Manage Service Applications create a new PerformancePoint Service Application.
In Central Administration navigate to Systems Settings > Servers > Manage services on server and make sure that the PerformancePoint Service is started.
In Central Administration > Application Management > Manage Service Applications > Secure Store Service Application click on Generate a new Key. Create a new key for the PerformancePoint Service. Navigate to PerformancePoint Service Application > PerformancePoint Service Application Settings and enter the username and password for querying the data sources in the Unattended Service Account section.
Go to your Site Collection (on which Web Application you activated Reporting Servies earlier) and activate the following:
Under Site Collection Features
Under Site Features
Juli 19, 2012
Business Intelligence Part 4: Configuring PowerPivot for SharePoint
Dieser Artikel steht nur in englisch zur Verfügung.
Part 1: Installing SQL Reporting Services
Part 2: Configuring Reporting Services
Part 3: Installing PowerPivot for SharePoint
Part 4: Configuring PowerPivot for SharePoint
Part 5: Configuring PerformancePoint Services
After the installation is successfully completed go to SharePoint Central Administration > Systems Settings > Farm Management > Manage farm solutions and make sure that the two PowerPivot Solutions are deployed to the Web Applications.
In Central Administration navigate to Systems Settings > Servers > Manage services on server and make sure that the following services are started: Claims to Windows Token Service, Excel Calculation Services, Secure Store Service, SQL Server Analysis Services, SQL Server PowerPivot System Service.
In Central Administration > Application Management > Manage Service Applications > Excel Services Application reconfigure your existing settings:
In Trusted File Locations add your Portal and your Central Administration URL, also check the Children Trusted checkbox, Change the Maximum Workbook Size to 2000 and the Maximun Chart or Image Size to 100.
If no PowerPivot Service Application exists, create a new one in Central Administration > Application Management > Manage Service Applications > Create a new SQL Server PowerPivot Service Application and add the proxy for this PowerPivot service application to the default proxy group.
In Central Administration > General Application Settings > PowerPivot you may adjust the settings for your needs.
Go to your Site Collection (on which Web Application you activated Reporting Servies earlier) and activate the following:
Under Site Collection Features
Now you can create a New Site using the PowerPivot Site template.
Juli 18, 2012
Business Intelligence Part 3: Installing PowerPivot for SharePoint
Dieser Artikel steht nur in englisch zur Verfügung.
Part 1: Installing SQL Reporting Services
Part 2: Configuring Reporting Services
Part 3: Installing PowerPivot for SharePoint
Part 4: Configuring PowerPivot for SharePoint
Part 5: Configuring PerformancePoint Services
Double-click setup.exe using the SharePoint 2010 Setup Account in the SQL Server 2008 R2 Enterprise binaries on the same SharePoint 2010 Application Server as you already installed the SQL Reporting Services.
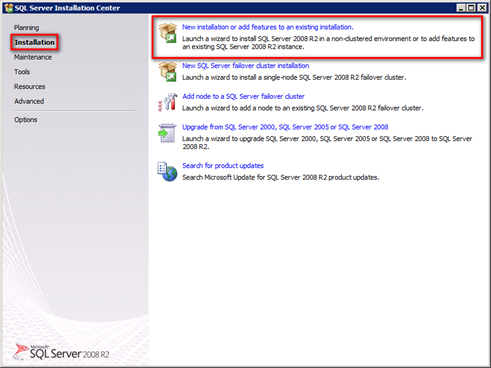
Select the Installation tab and click on New installation or add features to an existing installation.
The Setup Support Rules will be checked. No errors should occur. Click OK.
Sometimes you need to Install the Setup Support Files. Confirm all following queries.
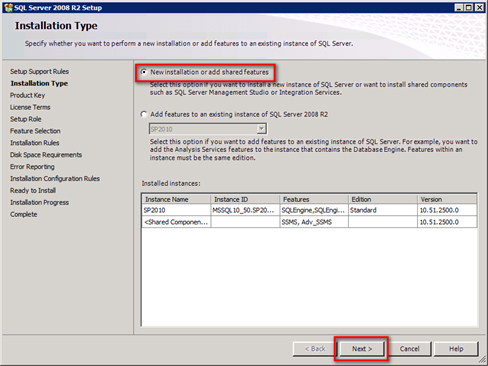
Select New installation or add shared features. Click Next.
Enter your License Key and accept the License Terms.
Select SQL Server PowerPivot for SharePoint and choose Existing Farm, if your SharePoint Farm is already configured. Click Next, Next, Next.
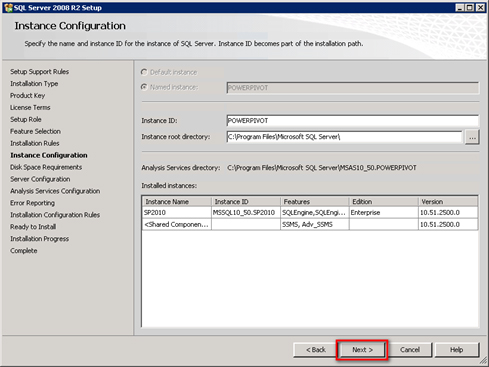
Create a new Instance named POWERPIVOT. Click Next, Next.
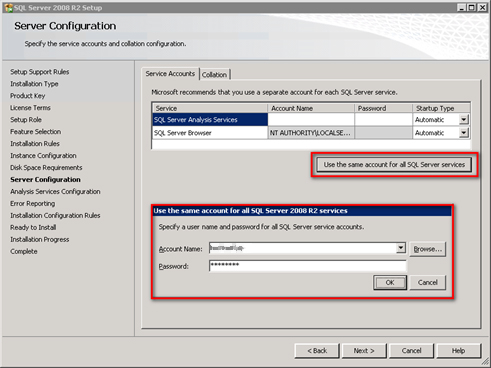
Enter the credentials of a dedicated SQL service account.
Go to the Collation Tab and change the collation to Latin1_General_CS_AS_KS_WS. Klick Next.
The Analysis Services Configuration window displays. Add the users you need. In this case SharePoint Setup and SharePoint Farm Accounts. Go to the Data Directories tab and change the directory locations.
Click Next, Next, Next, Install.
Juli 17, 2012
Microsoft enthüllt SharePoint 2013: Downloads & Infos
Microsoft hat das neue Office 2013 vorgestellt. Zusammen mit diesem wurden ebenfalls erste technische Informationen zu Office 2013 sowie SharePoint 2013 auf Technet und MSDN aufgeschaltet. Zeitgleich wurden die Office 2013 und SharePoint 2013 Previews zum Download bereitgestellt.
Downloads
SharePoint Foundation 2013 Preview
SharePoint Server 2013 Preview
Language Packs for SharePoint Foundation 2013 Preview
Language Packs for SharePoint Server 2013 Preview
Microsoft Office Web Apps Server Preview
Project Server 2013 Preview
SharePoint Designer 2013
Microsoft Office 2013 Preview
Duet Enterprise for Microsoft SharePoint 2013 and SAP 2.0 Preview
SharePoint 2013 Resources
Microsoft TechNet: SharePoint 2013 for IT pros
What’s changed in SharePoint 2013
Hardware and software requirements
Plan authentication
Plan for virtualization
Plan search
Plan for social computing
Plan for mobile devices
Plan for business intelligence
Plan for eDiscovery
Install and configure SharePoint 2013
Install and manage apps for SharePoint
Upgrade to SharePoint 2013
Backup and restore
Business intelligence operations
MSDN: SharePoint 2013 for developers
Training
SharePoint 2013 training for IT pros (Interactive Course)
SharePoint 2013 training for developers (Interactive Course)
SharePoint 2013: IT pro training (PPTX Presentations)
Apps
Build apps for Office and SharePoint
Apps for SharePoint 2013
Weitere Infos folgen in Kürze.


